
Almost everyone at some moment will meet the concept of clean architecture. There are a bunch of excellent articles which can give a solid theoretical background in this topic. This post will show one of the possible approaches to how we can organize our system to have a good starting point towards a clean and maintainable architecture.
What will we create?
Imagine our task is to build a simple API for a loan institution. To achieve this task, we will use a very popular stack: Java and Spring Boot. We will also try the reactive approach powered by Spring WebFlux and use some concepts borrowed from domain-driven design. In the sake of simplicity, we will implement only basic use cases and keep them as simple as possible.
I’m aware you can have a feeling that all the stuff described below is an overkill for such a simple application. If this is the case, bear in mind the application we are building here is just a demo. The advantages of the approach presented in the article begin to shine as our system grows.
All of the code presented in the examples come from my GitHub repository.
A high-level look
Let’s start with a high-level visualization. If you will ask Google about the term of clean architecture, you will probably see a lot of charts presenting something like that:
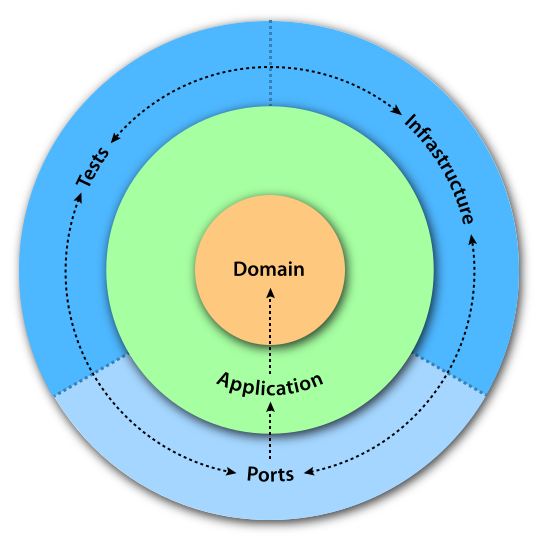
As we can see, an important part is to divide our system into specific layers. Even more important is to preserve a particular direction of dependencies between layers. Dependencies should go from the outside to the inside. This rule is quite intuitive because a change made in the presentation layer should not affect our core domain logic. A good organization of dependencies is one of the keys, which allow keeping our system architecture maintainable and open for extension. Let’s dive into details and see how to achieve the above construction in practice.
General structure
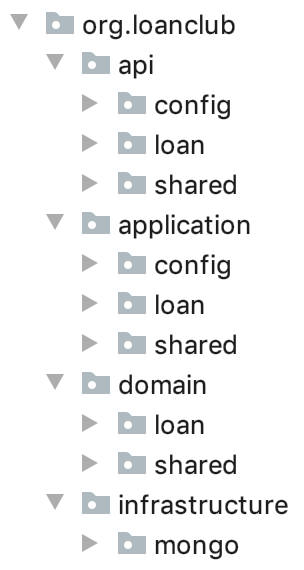
The aforementioned layers are a very high-level concept which indicates the general direction. To follow the right path, the system should be divided into separate architecture components with clearly outlined boundaries between them. It’s worth to note we can operate on different levels of abstraction and use multiple techniques to represent our components. Since our application is simple, we will operate on the source code level and build a classic Java monolith with components represented by packages and classes. Of course, there are plenty of more complex and sophisticated cases. For instance, a system can be a set of processes running on the same machine or a collection of (micro)services scattered among multiple machines.
Going back to our application, we can start with the following structure:
The domain layer
Let’s start coding! Suppose we want to implement a possibility to create a loan request. First of all, we should think about the domain logic. It is the heart of our system and gives value to the users. Domain components shouldn’t have any dependencies on components from higher layers. They should be stable.
A lot of people argue that the domain layer should be also completely free from frameworks code. There is a lot of sense in this opinion but I think that in practice, we should always be driven by pragmatism and apply this rule with common sense.
So, here is our first class representing a loan:
@Getter
public class Loan extends BaseAggregateRoot {

    private final Account account;

    private final Money amount;

    Loan(Account account, Money amount) {
        Preconditions.checkArgument(account != null, "Account cannot be null");
        Preconditions.checkArgument(amount != null, "Amount cannot be null");
        this.account = account;
        this.amount = amount;
    }
}
Our Loan class extends the BaseAggregateRoot base class which marks it as an aggregate. This is a domain-driven design concept and for this article, we can assume an aggregate is a set of entities and value objects which conceptually belong together. It also defines a set of business operations that can be performed.
Loan class is very primitive for now, but it should evolve to a full-fledged object encapsulating all the business logic related to loans. At some point, the creation of such objects may become complex. If we reach that point, we can externalize the creation logic using a dedicated factory class:
public class LoanFactory {

    public Mono<Loan> createLoan(Account account, BigDecimal amountValue, String currencyCode) {
        Money amount = new Money(amountValue, currencyCode);
        return Mono.just(new Loan(account, amount));
    }
}
Our LoanFactory class takes responsibility for creating new Loan objects. This way, we can keep the constructor simple. Also, if we need to create some cooperating objects (directly or through their factories) this is a good place to handle this, instead of packing everything into the Loan constructor.
You may be also surprised to see some Reactor types here. As I mentioned before, I’m aware of the rule about frameworks in the domain layer but this is a conscious decision. Reactor types leaking to the domain layer are a drawback because they introduce a dependency on a third-party library. But, this is the price we can pay to obtain a domain layer ready to work with a reactive application and gain some significant benefits in the future.
We should also think about a way to persist our loan objects. The domain layer should be unaware of the specific storage type used by the persistence layer. Instead of that, the domain layer should expose an interface and the persistence layer should take care of the implementation. This forces the correct direction of dependencies between both layers:
public interface LoanRepository {

    Mono<Loan> saveLoan(Loan loan);

    Flux<Loan> findLoansByAccount(Account account);
}
We are ready with the domain layer code. Regarding testing, we should cover everything with unit tests. This way we can assure all business rules works as expected and are ready to use by higher layers.
Application layer
Our next step towards implementing the possibility of creating a loan request is to write the application layer code. This layer is responsible for providing specific use cases that represent real business processes. A common building block used in this layer is the application service. In our case we will have:
@Service
public class LoanApplicationService extends BaseApplicationService {

    private final LoanFactory loanFactory;

    private final LoanRepository loanRepository;

    public LoanApplicationService(ModelMapper mapper,
                                  GenericValidator validator,
                                  SecurityService securityService,
                                  LoanFactory loanFactory,
                                  LoanRepository loanRepository) {
        super(mapper, validator, securityService);
        this.loanFactory = loanFactory;
        this.loanRepository = loanRepository;
    }

    @PreAuthorize("hasAuthority('LOAN_REQUESTOR')")
    public Mono<LoanProjection> createLoan(LoanCreateData loanCreateData) {
        return Mono.just(validator.validate(loanCreateData))
                .zipWith(securityService.getAuthenticatedAccount())
                .flatMap(t -> loanFactory.createLoan(
                    t.getT2(),
                    t.getT1().getAmountValue(),
                    t.getT1().getAmountCurrency()
                ))
                .onErrorMap(throwable -> new ApplicationException(throwable.getMessage()))
                .flatMap(loanRepository::saveLoan)
                .map(savedLoan -> mapper.map(savedLoan, LoanProjection.class));
    }
}
LoanApplicationService provides the createLoan use case which validates input data, performs some security checks, and orchestrates domain layer objects to create a loan. It is also responsible for handling errors and mapping Loan to LoanProjection, which is a data container specific to the application layer. A separate data container is used to prevent exposing the domain model outside.
In the application layer, we also use some features provided by Spring. In our case, those features are, for example, security, dependency injection or integration testing support.
Infrastructure layer
Now, we should think about a real solution to persist our loan objects. Let’s say we want to use MongoDB. Also, we want to benefit from Spring Data which can generate reactive repository classes automatically. We must only define an interface extending ReactiveMongoRepository:
@Repository
public interface MongoLoanRepository extends ReactiveMongoRepository<Loan, AggregateId> {
    // Basic methods are provided by ReactiveMongoRepository.
}
Next, recall the LoanRepository we defined in the domain layer. The infrastructure layer should provide an implementation of this interface. So, we provide the last part:
@Repository
public class LoanRepositoryAdapter implements LoanRepository {

    private final MongoLoanRepository mongoLoanRepository;

    public LoanRepositoryAdapter(MongoLoanRepository mongoLoanRepository) {
        this.mongoLoanRepository = mongoLoanRepository;
    }

    @Override
    public Mono<Loan> saveLoan(Loan loan) {
        return mongoLoanRepository.save(loan);
    }
}
We provide an adapter that implements LoanRepository from the domain layer and uses MongoLoanRepository implementation injected by Spring Data which interacts with the database. All of the details are nicely enclosed in the infrastructure layer and are invisible to the domain layer.
It is also worth to realize that the infrastructure layer is not only about database integration. If our system needs to use an external REST service, the client code should also live here. A big advantage of this approach is the fact we have all integrations in one place instead to have them scattered throughout the codebase.
The API layer
Finally, our application offers the possibility to create a loan request. The last thing is to decide how we will expose this feature to the external world. In our example, we will prepare a REST endpoint using Spring WebFlux. To achieve this goal we will write a LoanHandler class:
@Component
public class LoanHandler {

    private final LoanApplicationService loanApplicationService;

    LoanHandler(LoanApplicationService loanApplicationService) {
        this.loanApplicationService = loanApplicationService;
    }

    Mono<ServerResponse> createLoan(ServerRequest serverRequest) {
        return serverRequest.bodyToMono(LoanCreateData.class)
                .flatMap(loanApplicationService::createLoan)
                .flatMap(result -> ServerResponse.noContent().build());
    }
}
The main responsibility of the above is to handle an incoming request, trigger the correct parts of the application layer and prepare a response. Apart from that, we must define some configuration classes for Spring WebFlux to point a specific route to our handler:
@Configuration
public class LoanRoutesConfig {

    private final LoanHandler loanHandler;

    public LoanRoutesConfig(LoanHandler loanHandler) {
        this.loanHandler = loanHandler;
    }

    @Bean
    public RouterFunction<ServerResponse> loanRoutes() {
        return route()
                .nest(RequestPredicates.all(), builder -> builder
                        .POST("", contentType(APPLICATION_JSON), loanHandler::createLoan)
                .build();
    }
}
@Configuration
public class RoutesConfig {
private final Map<String, RouterFunction<ServerResponse>> routes;
public RoutesConfig(Map<String, RouterFunction<ServerResponse>> routes) {
this.routes = routes;
}
@Bean
public RouterFunction<ServerResponse> routes() {
return route()
.path("/api", builder -> builder
.path("/loans", () -> routes.get("loanRoutes")))
.build();
}
}We can now create a loan by sending a POST request to /api/loans. Regarding testing, we can leverage some integration tests at this point. We can write dedicated specs for each use case and check everything end-to-end.
The API layer can also provide other ways to interact with our application. For example, we can implement a listener which will trigger a specific use case in response to an incoming event from a message broker. There are plenty of possibilities and our architecture allows to implement them easily.
Conclusions
I have presented an idea on how to start building a simple application concerning the clean architecture principles. I hope this article will inspire you to think about architecture from the very beginning which in turn will lead toward better products. I also encourage you to check my GitHub repository where you will find the full code of the example application presented in this article.